
Chairman’s notes
Good evening. The AGM will be held immediately prior to tonight’s meeting. Should any issue require a vote, only members of the WFA are entitled to parcipitate.
As usual my thanks go to John Richardson for preparing the accounts and Phil Hamer for standing in during my absence. I am grateful for the ladies who run the raffle and for all those who have helped throughout the year. Thanks go also to Simon Cooper for preparing the hot pot. Naturally I wish to thank Ann for her support. I am also indebted to the people at the TA for allowing us the use of their facilities. I also wish to thank Captain Lesley Oldham for providing us with the improved facilities that we enjoy. Last, but by no means least, thank you for your continued support throughout the year.
I am very pleased to welcome Arthur Aston to the Branch. You all know my interest in tonight’s subject and I am looking forward to Arthur’s talk.
Terry Jackson, Chairman
100 Years Ago
On 19 March 1917, during the German Army's withdrawal to the Hindenburg Line, the Australians entered the remains of the city of Bapaume. They continued their pursuit of the retreating Germans, gaining possession of a succession of ruined villages (Vaulx-Vraucourt, Morchies, and Beaumetz), before coming up against the German rearguard. It fought ferocious delaying actions at Lagnicourt, Noreuil, and Hermies. Finally, on 9 April, they reached the Hindenburg Line, a seemingly impenetrable line of defences comprising extensive barbed wire entanglements, rows of deep trenches, machine gun nests positioned behind concrete shields, extensive tunnels, slit trenches and deep bunkers.
In addition to the forthcoming grand offensive at Arras, to be launched by the British 1st and 3rd Armies in early April 1917 as a prelude to the French offensive on Chemin des Dames Ridge, General Hubert Gough, chief of the British 5th Army to which the four Australian divisions belonged, proposed they should attack the narrow section of the front between the two strong points of the Hindenburg Line in the villages of Bullecourt and Quéant. A preliminary bombardment to clear a way through the barbed wire was planned. However, informed of the initial British successes at Arras on 9 April, Gough decided to bring forward the attack. This left no time for shelling. Gough reasoned that tanks would be able to lead the Australian cavalry through the barbed wire to take advantage of any breach in the enemy's line. But tanks were in short supply, not very reliable, and their crews had received little training.
Unsurprisingly, Gough's improvised plans ended in disaster when he launched his infantry against the heavily fortified German line without proper artillery support... After an initial delay on 10th April to give the tanks time to arrive, the attack opened at dawn the following day. At 4.45 a.m., in the freezing cold, Australian soldiers flowed out from behind the shelter of the railway embankment and headed out on to the flat terrain leading up to the Hindenburg Line. They were supported by just eleven tanks which, as it turned out, played no significant role in the fighting. The attackers were soon swamped by German machine gun fire and heavy shelling.
Losses came quickly and were huge. Those at the forefront were severely impeded by the barbed wire, many getting entangled and subsequently picked off by German artillery. A few soldiers making good use of hand grenades managed to gain a hold in the German front line and did their best to turn the captured trenches to their advantage. A lack of men and ammunition prevented the Australians from advancing to the second line and they soon came under the intense artillery fire of a German counter-attack. The small pockets of soldiers who attempted an advance were immediately wiped out.
The counter-attack was launched by the soldiers of the German 27th Württemberg Division. They flowed out of deep underground shelters on the second line, unharmed and ready for action. The Australian retreat was prosecuted in the worst possible conditions; under heavy fire. The soldiers had to cross a no man's land littered with their fallen comrades. Those who remained in the German trenches were quickly rounded up. After eight hours of fighting, only a tiny minority of the Australian force succeeded in reaching the safety of the Allied line. In the afternoon a spontaneous truce was observed for the soldiers to recover their wounded comrades and remove some of the dead.
By the end of the day the horrific losses became apparent: the Australian 4th Brigade had lost 2,229 soldiers out of 3,000 and 1,170 Australians had been taken prisoner; all the battalions had been put out of action
Hoping to take advantage of the Australian troop’s disarray, the Germans launched an attack at Quéant a few days later on 15 April. They briefly took part of the Australian first line at Lagnicourt but were forced to fall back, both sides suffering heavy losses. 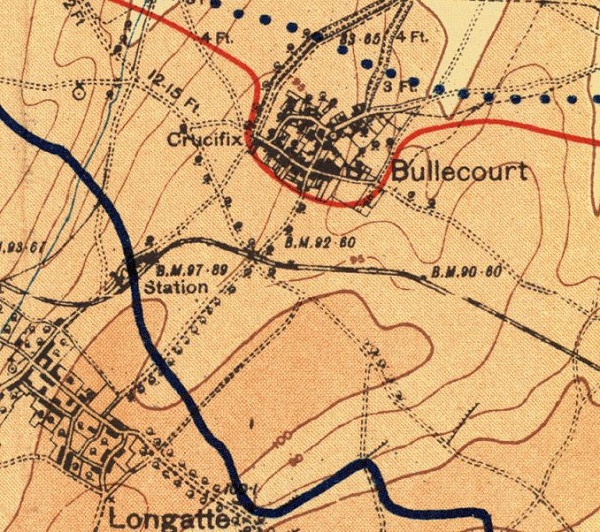
The total failure of General Nivelle on Chemin des Dames Ridge led the French Army to call for a renewed British offensive at Arras, despite the hopeless nature of the situation. The Australians of the 1st ANZAC launched a new assault at Bullecourt in the company of the British 62nd Division. The Second Battle of Bullecourt began at 3.45 a.m. on 3 May with eight successive waves of infantry, this time supported by artillery fire. The Australians broke through the partially destroyed barbed wire entanglements, passing many of their comrades killed the month before and still lying in the mud. The 5th Brigade, cut to pieces by machine gun fire, was forced to withdraw before crossing the barbed wire and this brought to a halt the following waves of infantry. A few young officers intervened to get the men moving forward again but by the end of the day no real gain had been made and the Second Battle of Bullecourt deteriorated into a tragic repetition of the first. Only the survivors of the 6th Brigade managed to take 400 metres of the German front and press on to the second line, receiving reinforcements under cover of night
In the following days the Australians strengthened their positions and dug a communication trench back to their home line to collect fresh munitions and evacuate the wounded. Despite a German counter-attack on 6 May, the British 7th Division gained a foothold in the ruins of Bullecourt on 7 May and subsequently connected with the Australian bridgehead. In the following days the British and Australians were subjected to continuous shelling and, in some areas, the Germans attacked with flame-throwers. Sporadic fighting broke out over the next few days but all action ceased on 15 May.
The Second Battle of Bullecourt inflicted 7,000 more losses on the Australians with very little to show for the effort except for the capture of a minute portion of the Hindenburg Line. The Australian troops had been pushed to the extreme and exhibited some defiance towards the British command. Nevertheless later that year, between July and November 1917, they took part in the bloody fighting of the Third Battle of Ypres launched by General Douglas Haig. Bullecourt, which the Australians had handed over to the British prior to their transfer, was lost once again in March 1918 before being liberated for good a few months later in September. The tragic events at Bullecourt and a few other locations in the north of Somme contributed to the awakening of the Australian nation.
Australian lieutenant Wilfred Barlow, a volunteer, schoolteacher, husband and father of four, was killed at Bullecourt on 12 May, literally smashed to pieces by an artillery shell. Shortly before his death he wrote to his wife, "I hope the war will soon be over because it is destroying the best men and everything that is beautiful and civilized in life."
Ed